A quick guide to LaTeX
Some notes on how to create documents using the LaTeX language
Tags: codingPosted on: 2014-10-28
Introduction
LaTeX is one of those things that's well known in a couple of specific fields such as mathematics, physics, philosophy and others. But for many, it can be a perfectly good replacement for common word processing applications. LaTeX is a typesetting system for the publication of documents. Few people learn of it because word processors tend to be far more approachable. Yet, this language has a lot of interesting benefits:
- It's text-based, which means a
.texdocument can be created and edited in any text editor, on any system, without requiring a specific word processor. - It uses macros to automate tasks.
- It's very good at creating output for various formats and devices like PDF or enterprise printers used by publishing houses.
- It handles international languages and symbols very well.
However it also has a few drawbacks:
- It's a heavy, complex language with a steep learning curve.
- It's not WYSIWYG.
LaTeX is a vast subject and this document certainly won't cover it all. There are lots of great guides available online focusing on various parts of the language. Instead, here we will focus on getting started quickly to write general purpose documents and convert them to PDF format. We will also cover a few tips that will help make your LaTeX experience better, such as automated tools and better presentation packages.
Before getting started it's useful to realize what LaTeX is good at. While you could use it to create any type of document, that's probably not wise. More often than not, you should use it if you want to create medium to long form content. If you expect your content to be in PDF or printed form, this will work perfectly for you. Whether you're writing documentation for a product, a school paper, a business report, or anything similar, then once you learn LaTeX you will find it quite good at these tasks.
Software packages
The first thing to learn about LaTeX, and TeX in general, is that this language is very old and has evolved over time. It was first created in the 1980s and as such many different engines have appeared. You may see references to tools such as XeLaTeX, LuaLaTeX, PDFLaTeX and more. Each of these can handle a typical .tex file but they focus on specific areas. They each come with their own macros, and are thus aimed for a specific type of document. For example, LuaTeX is a LaTeX extension implementing the Lua scripting language.
To convert a .tex file into a PDF or PostScript file, the two most common output formats for LaTeX, you need to basically compile the code you write into the wanted format. Instead of learning all the commands, I highly suggest you download Texmaker, a visual LaTeX editor for Windows, OS X and Linux. This will allow you to write your document with syntax highlighting, see a live preview, and handle everything at the touch of a button.
Now that you have a proper interface, you still need to download the LaTeX package itself, since all Texmaker will do is run these commands in the background. If you're on Windows, I suggest MiKTeX which comes with an easy installer. Simply follow the instructions to get it installed and added to your PATH so Texmaker can detect it. You may need to restart in order for the settings to take effect.
On Linux, each distribution comes with LaTeX packages and you should refer to your distribution's documentation to know the exact names.
First document
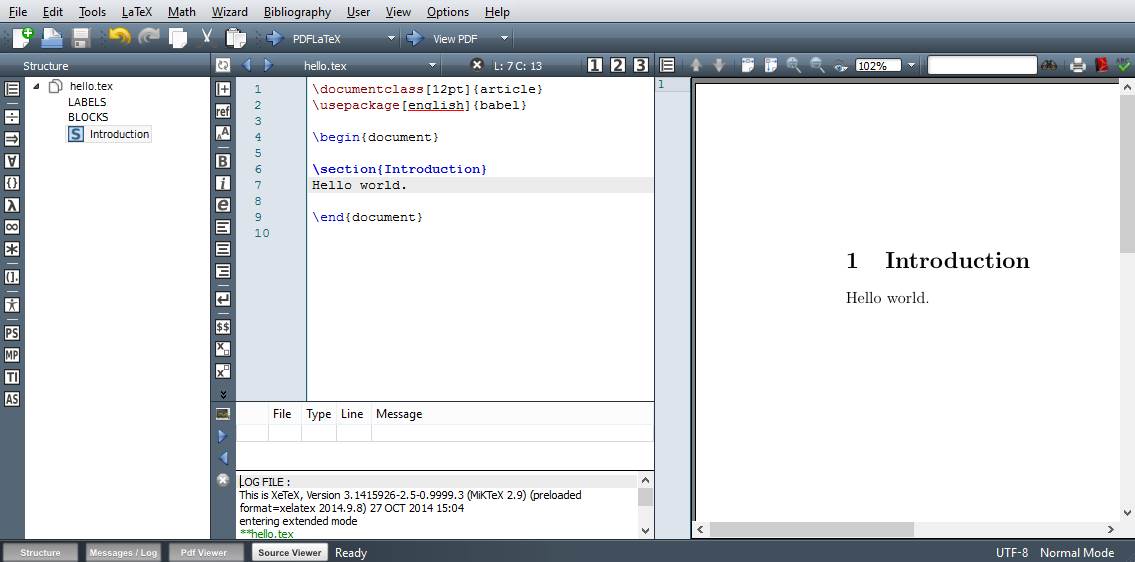
Now that you have a LaTeX package installed and Texmaker opened, create a new document and paste in the following code:
\documentclass[12pt]{article}
\usepackage[english]{babel}

\begin{document}

\section{Introduction}
Hello world.

\end{document}
This is pretty much the least amount of code you can write to have a complete document. As you can see, LaTeX is a series of commands starting with \ that tells the engine what to render on the screen. You can also insert those commands from the Texmaker graphical interface by going to the LaTeX menu at the top of the screen.
In the toolbar, next to the right arrow where it says LaTeX, use the down arrow and select PDFLaTeX instead, then click on it. This will compile the document into a PDF, bypassing the intermediary step that LaTeX usually does, converting from TeX to DVI and then to PDF. After that, press the button next to it which says View PDF. Your document should appear:
If it doesn't work, look at the log in the bottom of the middle pane to see the errors. Every time you compile your document, that log will show what happens behind the scenes. You will likely see a lot of warnings about text out of bound, but any red error may prevent the PDF from being created and has to be addressed.
Let's quickly go over the code we've entered. Every document starts with \documentclass{}. This is a macro, just like every other escaped command you see in the code above. Here, we're starting an article class, and passing the option 12pt which is simply the font size. The next line uses the \usepackage{} macro. We specify the exact package to use, in this case babel, and pass on a variable, in this case english. This package includes utilities to parse various languages for your document.
If you've done any coding or scripting in the past, this should be very easy. Even if not, it's not hard to extrapolate what the two lines we've seen are about. As you may already have realized, changing the font size is simply a matter of changing 12pt to 14pt or any other point value you want on the first line. Similarly, if you're writing a document in french, then you can change the english statement for french. There are many other headers we can use here, and we'll see several more in time.
For the rest of the example above, we have a \begin{} statement, some more stuff, then a \end{} statement. These are used to tell LaTeX about a block of code. There are many things we can begin and end, such as centering text or doing syntax highlighting. In this case, we specify where the document starts, and where it ends. So anything in between those two lines will be part of the document itself, and anything before that block is part of the headers.
The \section{} line is used to write a new section title, in this case Introduction, then we have the sentence Hello world. which simply writes the text in that section. There are many macros used for chapters, sections, sub-sections, paragraphs, and so on.
Paragraphs and fonts
Let's write some more of our document. Clear what's in your Texmaker window, and paste the following:
\documentclass[12pt]{article}
\usepackage[english]{babel}

\begin{document}

\section{Introduction}

This document is simply for testing purposes. As such, nothing much will be of use here, but we will learn a lot while writing this code.

If this were a real document, there would likely be far more text. However, this is all I could come up with in such short notice. Hopefully it will be enough to demonstrate the concepts we need.

\clearpage

\section{Conclusion}

Hopefully we have learned quite a lot from these tags, macros and other LaTeX concepts. Have a nice day!

\end{document}
Once again, click the PDFLaTeX button then refresh the PDF view. Here we have the same basic structure, but we've added some more text. If you notice on the preview, several things have happened. First, each paragraph now has blank lines in-between, and has its first word indented. This is what the empty lines do, or you can use the \par primitive. This is a basic TeX command which tells the engine that a paragraph is about to start. You can change what the start of each paragraph looks like in the header, such as how many characters the indenting should be, and so on. The ability to control all of this precisely is what makes LaTeX so powerful.
The other new primitive here is \clearpage. Typically, we would let our document flow from one page to the next, but to demonstrate pages we've added this command so we would have two separate pages. This allows us to see another useful feature of LaTeX, the automatic page numbering added in the footer. Again, this is something we can modify.
First however, let's make our document look better. By default, LaTeX provides a number of built-in font packages, but you may want to use more modern OpenType or TrueType fonts installed on your system. To use modern fonts, we will need to change from PDFLatex to XeLaTeX. Add the following headers just before your \begin{document} line:
\usepackage{fontspec}
\setmainfont{Verdana}
Compile it with XeLaTeX and once you View PDF, you should notice the font looks quite a bit better. You can experiment with various fonts here such as Arial or Tahoma. This engine allows you to use any font installed on your local machine.
To accomplish this, we've loaded another package here called fontspec and used one of its macros, \setmainfont{}. This is a good time to talk about packages. LaTeX has hundreds of packages available that affect how your document will look like. If you're on Windows, you can manage those packages by using MiKTeX Package Manager. There's also an online package repository called CTAN which you can use to browse available packages.
Margins, graphics, bold and italic
Let's quickly go over various other headers you may want to use to improve your document. First, let's edit the margins:
\usepackage{geometry}
\geometry{a4paper, right=30mm, left=30mm, top=35mm, bottom=25mm}
Again, we're simply loading a package and using one of its macros, specifying some options such as the paper type and the margins for each side of the document. This macro accepts a number of options, such as landscape to have a landscape document, and those margins could also be in inches instead. Then, let's change the paragraph indent and spacing:
\setlength{\parindent}{1em}
\setlength{\parskip}{1em}
You can recompile your document and refresh the live view each time to see how this affects your document. Finally, let's add a package that will allow us to insert images:
\usepackage{graphicx}
The graphicx package has various macros that make it easy to insert an image using the \includegraphics{} macro, with the name of the file specified. By default, the engine will look in the working folder for an image of a supported format, such as JPEG or PNG.
Let's see a more complete version of our document now:
\documentclass[12pt]{article}
\usepackage[english]{babel}
\usepackage{setspace}

\usepackage{fontspec}
\setmainfont{Verdana}   % Verdana font

\usepackage{geometry}   % paper type and margins
\geometry{a4paper, right=30mm, left=30mm, top=35mm, bottom=25mm}

\setlength{\parindent}{1em}  % paragraph indent
\setlength{\parskip}{1em}   % paragraph spacing

\usepackage{graphicx}   % images package

\begin{document}

\tableofcontents

\clearpage

\section{Introduction}

This document is simply for \textbf{testing purposes}. As such, \textit{nothing} much will be of use here, but we will learn a lot while writing this code.

If this were a real document, there would likely be far more text. However, this is all I could come up with in such short notice. Hopefully it will be enough to demonstrate the concepts we need.

\subsection{Various notes}
\subsubsection{Audience}

The \textit{audience} for this document is unrestricted.

\subsubsection{Acknowledgments}

We would like to \textit{thank} the makers of LaTeX to have made this tutorial possible.

\clearpage

\section{Conclusion}

Hopefully we have learned quite a lot from these tags, macros and other LaTeX concepts. Have a nice day!

\end{document}
As you can see the document is starting to be quite lengthy. Here we have the same code as earlier, plus the headers we've added, and a few more things. The first thing you may notice is the use of % characters to denote comments. This is useful to note what each command does, once your document becomes quite large. Then, you may also notice the command \tableofcontents. Once again we see a useful feature of LaTeX, the ability to use your sections and chapters to generate a table of content.
To make the table more visually appealing, I also added some \subsection{} and \subsubsection{}. These can be used to create a tree of sections as you write your document. Here, the introduction has a subsection, which in turn has two of its own. Finally, you may notice two more macros spread throughout the text, \textbg{} and \textit{} which are used to add bold and italic.
Title page
By now you should have a good grasp of what a LaTeX document looks like. By using the previous code snippet, you can expand it and write a fairly good document. But we're still missing a few important commands to add more visually appealing objects.
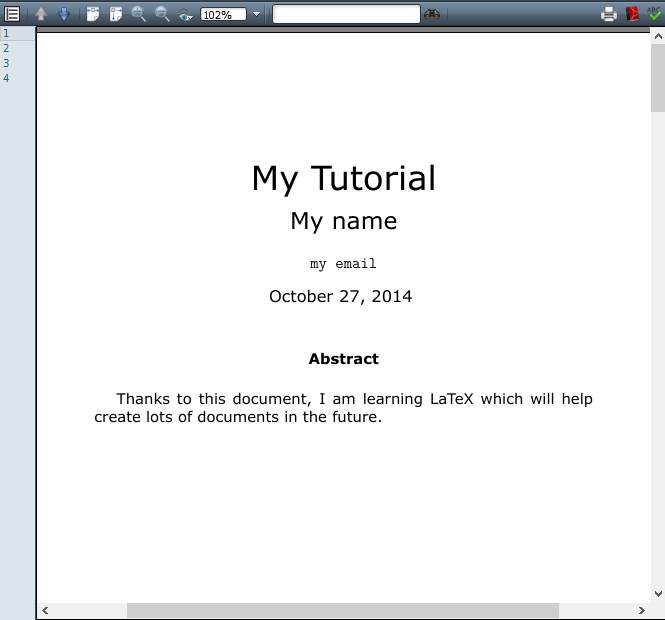
First, let's make a title page. Paste the following just after your \begin{document} tag:
\begin{titlepage}
\begin{center}
{\setstretch{2.0}
 {\Huge My Tutorial}\\
 {\Large My name}\\
 \texttt{my email}\\
 \bigskip
 \today}
\bigskip
\begin{abstract}
 Thanks to this document, I am learning LaTeX which will help create lots of documents in the future.
\end{abstract}
\end{center}
\end{titlepage}
This may seem like a lot of code just for a title page, and there are ways to create it with less commands, but this gives you good flexibility. As you can see, we once again use \begin{} and \end{} to create a titlepage, and also to center everything. Then, we set a bigger spacing between each line with \setstretch{2.0} which is part of the setspace package.
On the next two lines we see macros that are used to change font size. You may remember how we set the default font point size at the start of the document, but you can still enlarge a section of text or make it smaller with commands like \Huge{} and \Large{}. Here is a full list, from smallest to biggest:
\tiny\scriptsize\footnotesize\small\normalsize\large\Large\LARGE\huge\Huge
We also modify the font family for the email using \texttt{} to set a true-type font. Similar to font size, you can modify a section of text to change the font family.
Because this is a title page, we need a lot of spacing. You can see the \\ sequence to indicate that even though we aren't starting a new paragraph with \par or a blank line, we still want the line to end. You can use that sequence any time you want a single line of text by itself. \bigskip is then used to insert a certain amount of vertical space. You could control exactly how much vertical space to insert with \vspace{length}. Finally, we use the abstract section to define what the document will be about.
This starting page looks like this:
Lists and tables
Lets end this tutorial with a couple more concepts. Lists, for example, are very easy to do. There are two types of lists, first the itemize list:
\begin{itemize}
 \item The princess must be in another castle.
 \item Perhaps this castle is not the right one.
\end{itemize}
And also the enumerate list:
\begin{enumerate}
 \item First task.
 \item Second task.
\end{enumerate}
Tables on the other hand can be more complicated:
\bgroup
\def\arraystretch{1.3}
\begin{tabular}{ |p{50mm}|p{50mm}|p{30mm}| }
 \hline
 First name & Last name & Age\\
 \hline
 John & Doe & 28\\
 Mary & Smith & 26\\
 Jane & Levant & 34\\
 \hline
\end{tabular}
\egroup
Here, the first thing we do is group the whole block of code together with \bgroup and \egroup. This is equivalent to using { } as we've done in the past, for example in the title page. Then, we define line spacing to be 1.3 so that our table looks better, and we being a tabular section, which is the table itself. The argument passed is the table definition, which is a list of columns, how the text should be centered, and how large the columns should be, each divided with | characters.
In our case, we define three columns, the first two are 50mm and the last is 30mm. The text is going to be top-aligned which is what the three p characters mean. After that, we add horizontal lines with \hline and define all of the rows. Here are a couple more examples of table definitions:
\begin{tabular}{||c c c c||}This creates a table with four columns, center-aligned, with two lines on the left and two on the right, no lines between cells.\begin{tabular}{|l|l|r|}This creates a table with three columns, the first two being left-aligned, with the last being right-aligned.\begin{tabular}{ m m }Finally this table has two columns, the text middle-aligned, with no lines at all.
Conclusion
There's a lot more we could cover, such as advanced options for the concepts we've seen, math functions, bibliographies, code listings, and so on. But the purpose of this tutorial was a quick introduction to LaTeX as an everyday word processing option. Hopefully, you should now be able to create many types of documents. As you expand your use of the language, you will no doubt want to research more commands, and there are a lot of online resources that can be used for that.